Table of Contents
Ultimate Chocolate Lava Cake – The Best Decadent Dessert
Introduction
I’ve always been a chocolate lover, and nothing satisfies my sweet tooth quite like a perfectly made chocolate lava cake. The first time I made one, I was convinced I had failed—until I cut into it and watched the rich, molten chocolate ooze onto my plate. That first bite? Pure magic.
If you’ve ever had a chocolate lava cake at a fancy restaurant and thought, “There’s no way I could make this at home,” think again! This indulgent dessert is surprisingly easy to master with the right ingredients and techniques. In this guide, I’ll walk you through everything you need to know to create the ultimate chocolate lava cake from scratch.
Whether you’re baking for a romantic dinner, a family treat, or just to satisfy your chocolate cravings, this recipe will ensure your cakes turn out perfectly gooey every time. Let’s dive in!
Introduction to Chocolate Lava Cake
The Origin of Chocolate Lava Cake
Chocolate lava cake is a fusion of two desserts—a soufflé and a traditional cake. Though some believe it originated in France, the dish is often credited to Jean-Georges Vongerichten, a renowned French chef who reportedly underbaked a chocolate cake by accident in the 1980s. The result? A soft, cake-like exterior with a molten chocolate core—an instant sensation!
Others argue that a similar dessert existed in France well before Vongerichten’s discovery. Either way, this delightful treat quickly became a global favorite, appearing on restaurant menus and in home kitchens worldwide.
Why It’s a Must-Try Dessert
There’s something undeniably luxurious about cutting into a chocolate lava cake and watching the warm, rich center spill out. Here’s why this dessert is a must-try:
✔ Quick and Easy – Takes under 30 minutes from start to finish.
✔ Minimal Ingredients – You probably already have most of them in your pantry!
✔ Impressive Presentation – Looks and tastes like a gourmet dessert.
✔ Perfect for Any Occasion – Whether it’s a date night, a birthday, or a cozy night in, lava cake always impresses.
If you’ve never made one before, don’t worry! With the right ingredients and steps, you’ll have a gooey, rich lava cake that rivals any restaurant’s version. Let’s move on to the most important part—choosing the right ingredients.
Key Ingredients for the Ultimate Chocolate Lava Cake
Choosing the Best Chocolate for Lava Cake
The quality of your chocolate makes or breaks your lava cake. Cheap chocolate will result in a less decadent flavor, while premium chocolate will give you that deep, velvety richness. Here are the best options:
🥇 Dark Chocolate (60-70% cacao) – The best choice for a deep, intense flavor.
🥈 Semi-Sweet Chocolate (50-60% cacao) – Slightly sweeter but still rich.
🥉 Milk Chocolate (30-40% cacao) – For a sweeter, creamier taste (but less “lava” effect).
If you’re looking for brand recommendations, Valrhona, Ghirardelli, Lindt, and Callebaut are some of the best choices for baking.
Essential Ingredients and Substitutions
A great lava cake relies on five main ingredients:
✔ Chocolate – As mentioned above, use high-quality dark or semi-sweet chocolate.
✔ Butter – Adds richness and helps create the smooth, molten texture.
✔ Eggs – The secret to the cake’s structure. You’ll need both whole eggs and egg yolks for a perfect balance of fluffiness and density.
✔ Sugar – Granulated sugar enhances the sweetness, but brown sugar can add a caramel-like depth.
✔ Flour – A small amount of all-purpose flour helps the cake hold its shape while keeping the center gooey.
Optional Additions & Substitutions
🔹 Gluten-Free Option: Use almond flour or gluten-free baking flour instead of all-purpose flour.
🔹 Dairy-Free Option: Swap butter for coconut oil or a dairy-free butter substitute.
🔹 Extra Flavor Boost: Add a teaspoon of espresso powder or vanilla extract for enhanced richness.
With these ingredients in hand, you’re all set to create the most delicious chocolate lava cake of your life. Up next, I’ll guide you through the step-by-step baking process to ensure you get that perfect molten center.
Step-by-Step Guide to Making Chocolate Lava Cake
Preparing the Batter: Tips for a Perfect Consistency
The key to a perfect lava cake is getting the batter just right. Follow these steps to ensure your cakes have a rich, velvety texture with a gooey center:
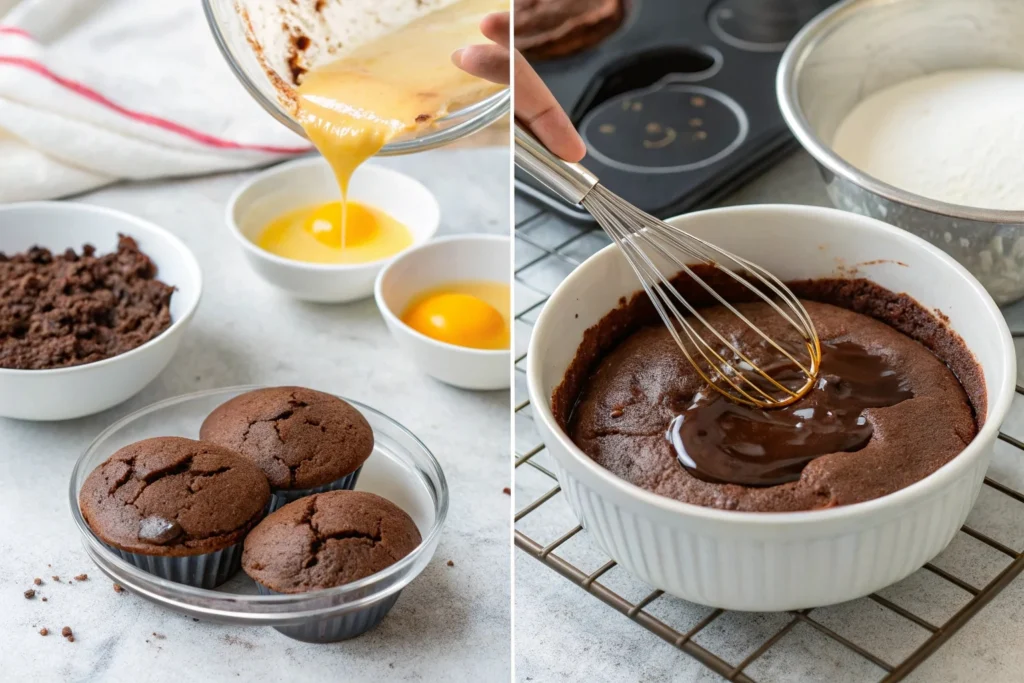
1️⃣ Melt the Chocolate & Butter
- Use a double boiler (a heatproof bowl over simmering water) to melt the chocolate and butter together.
- Stir continuously until smooth, then remove from heat and let it cool slightly.
2️⃣ Whisk the Eggs & Sugar
- In a separate bowl, whisk together two whole eggs, two egg yolks, and sugar until the mixture is pale and slightly thick.
- This helps create a light, airy texture while maintaining structure.
3️⃣ Combine Wet & Dry Ingredients
- Slowly pour the melted chocolate mixture into the egg mixture, stirring constantly.
- Gently fold in the flour and a pinch of salt to avoid overmixing, which can make the cake too dense.
Baking Time and Temperature: Avoid Overcooking
📌 Temperature & Time:
- Preheat your oven to 425°F (218°C).
- Grease and lightly flour four 6-ounce ramekins to prevent sticking.
- Fill each ramekin about ¾ full with batter.
⏳ Baking Duration:
- Bake for 10–12 minutes until the edges are set but the center is slightly jiggly.
- Overbaking will turn your lava cake into a regular chocolate cake—still delicious, but not what we want!
Testing for Doneness
✔ The edges should look firm and slightly pulled away from the ramekin.
✔ The center should wobble slightly when shaken.
✔ A toothpick inserted ½ inch from the edge should come out clean, but the center should still be gooey.
Once baked, let the cakes rest for 30–60 seconds, then invert them onto a plate. Serve immediately for the best-molten lava effect!
Alternative Baking Methods
Making Lava Cake Without an Oven
No oven? No problem! You can still enjoy a molten chocolate cake using a stovetop or slow cooker:
🔥 Stovetop Method:
- Use a heavy-bottomed pan and grease small heatproof bowls or mugs.
- Pour in the batter and cover with foil.
- Cook on low heat for 10–15 minutes, checking frequently.
🐢 Slow Cooker Method:
- Grease ramekins and fill them with batter.
- Place them in a slow cooker with 1 inch of water at the bottom.
- Cover and cook on high for 45–60 minutes.
Using an Air Fryer or Microwave
If you’re short on time, try these quick alternatives:
🍽 Air Fryer Method:
- Preheat the air fryer to 375°F (190°C).
- Place the ramekins inside and cook for 7–8 minutes.
⏲ Microwave Method (Super Quick!)
- Use microwave-safe mugs instead of ramekins.
- Microwave on high for 45–60 seconds—be careful not to overcook, as microwaves vary in power.
💡 Tip: Let the cake rest for 30 seconds before digging in. The heat will continue to cook the center slightly while keeping the lava effect!
Common Mistakes and How to Fix Them
Why Is My Lava Cake Not Gooey in the Center?
If your cake turns out too solid, it’s likely due to one of these reasons:
❌ Overbaking – Reduce your baking time by 1–2 minutes.
❌ Too Much Flour – Use the exact measurement to keep the batter soft.
❌ Not Enough Butter or Chocolate – These ingredients contribute to the molten texture.
Avoiding Undercooked or Overcooked Cakes
⚠️ Problem: The cake is raw in the middle
✔ Solution: Increase baking time by 1–2 minutes.
⚠️ Problem: Cake won’t come out of the ramekin
✔ Solution: Grease and flour the ramekin properly before baking. Let the cake rest for 30 seconds before inverting.
⚠️ Problem: Cake collapsed when flipped
✔ Solution: Let it cool for 30–60 seconds before inverting. If needed, serve directly in the ramekin instead!
By following these troubleshooting tips, you’ll be able to master the perfect chocolate lava cake every time. Up next, we’ll discuss the best chocolate brands to use for ultimate flavor!
Best Chocolate Brands for Lava Cake
Dark, Milk, or Semi-Sweet: What’s Best?
The type of chocolate you use significantly impacts the flavor and texture of your lava cake. Here’s a breakdown of the best options:
🍫 Dark Chocolate (60-70% cacao) – Best for an intense, slightly bitter flavor.
🍫 Semi-Sweet Chocolate (50-60% cacao) – A balanced choice with both sweetness and depth.
🍫 Milk Chocolate (30-40% cacao) – Sweeter, creamier, but less intense in flavor.
🔹 Best for Lava Cake? Dark or semi-sweet chocolate works best to achieve a rich and decadent taste. If you prefer a sweeter version, go for semi-sweet.
Top Chocolate Brands to Consider
For the best results, choose high-quality chocolate that melts smoothly and enhances flavor. Here are some of the top recommended brands:
🥇 Valrhona – Premium French chocolate with deep cocoa notes.
🥈 Callebaut – Excellent for baking, melts beautifully.
🥉 Ghirardelli – Widely available, rich in flavor.
🏅 Lindt – Smooth texture, great balance of sweetness and bitterness.
🏅 Guittard – A well-rounded chocolate option for desserts.
💡 Pro Tip: Always use chocolate bars instead of chocolate chips. Chips contain stabilizers that prevent them from melting properly. If using chips, add ½ tsp of coconut oil or butter to help them melt smoothly.
Now that we’ve got the best chocolate, let’s move on to how to present and serve your lava cake like a pro!
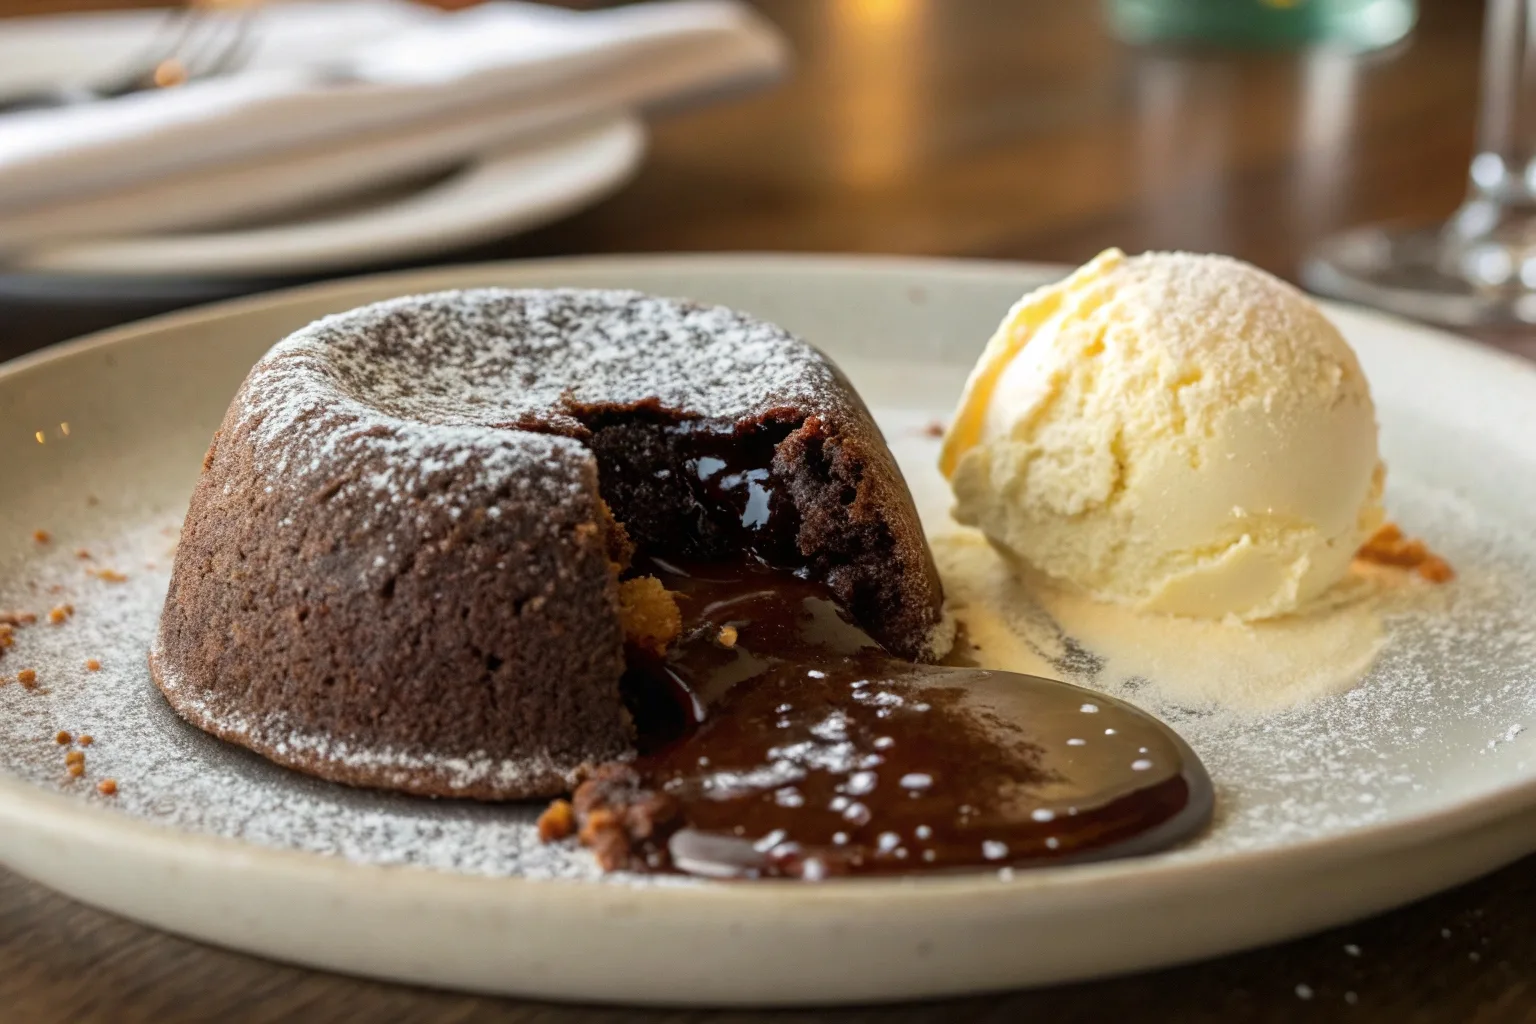
Serving and Presentation Tip
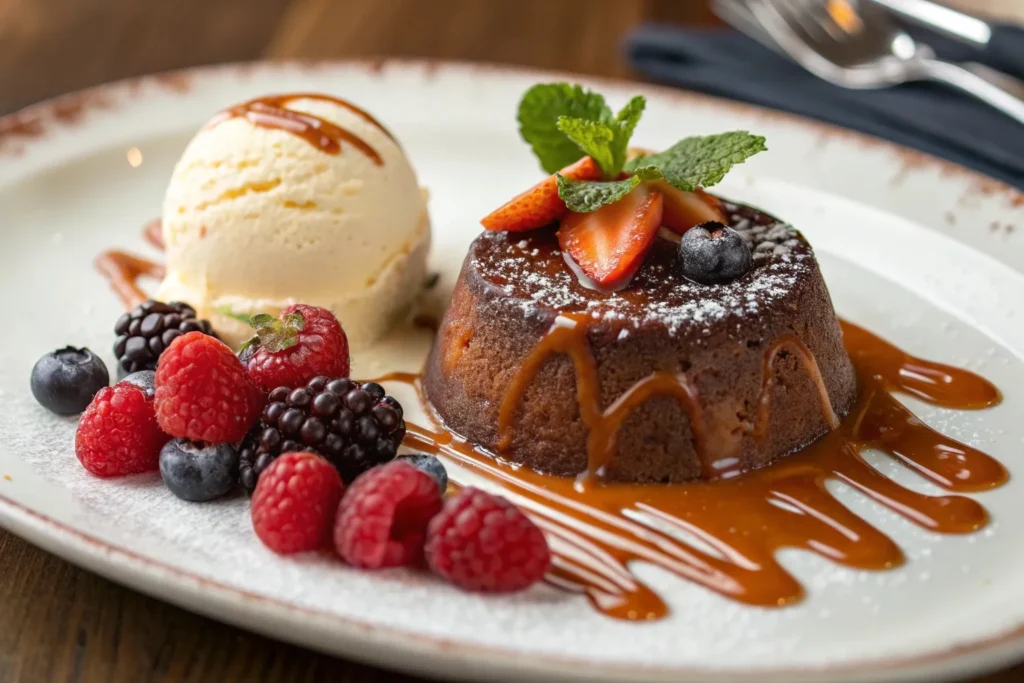
How to Plate and Garnish for a Stunning Look
A chocolate lava cake should not only taste delicious but also look Instagram-worthy! Here’s how to make your dessert visually stunning:
📌 Plating Tips:
✔ Invert the cake onto a pre-warmed plate to keep it warm.
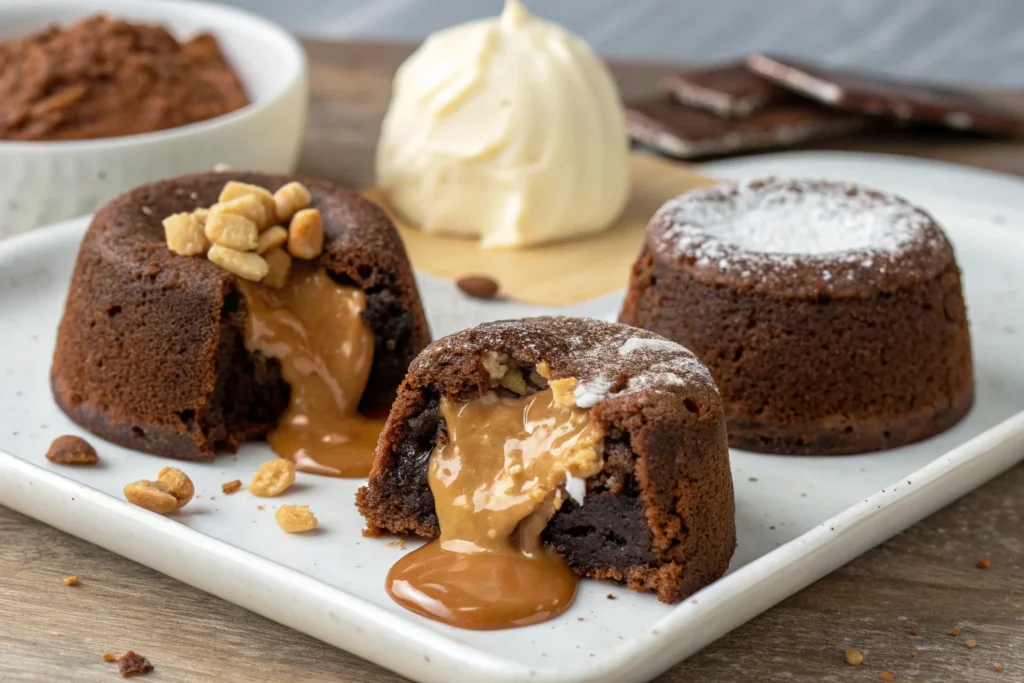
✔ Dust with powdered sugar or cocoa powder for an elegant touch.
✔ Drizzle with melted chocolate or caramel sauce for extra indulgence.
📌 Garnishing Ideas:
✔ Fresh Berries – Adds a burst of color and tangy contrast.
✔ Mint Leaves – Brightens the presentation and adds freshness.
✔ Edible Gold Leaf – For a fancy restaurant-style touch.
Best Ice Cream and Toppings for Lava Cake
🍦 Classic Pairings:
- Vanilla Ice Cream – The go-to choice for a creamy, cool contrast.
- Salted Caramel Ice Cream – Enhances the sweetness with a hint of saltiness.
- Espresso or Mocha Ice Cream – A perfect match for deep chocolate flavors.
🍯 Toppings to Try:
✔ Whipped Cream – Light and fluffy addition.
✔ Toasted Nuts – Adds crunch and nutty richness.
✔ Shaved Chocolate – A fancy touch for extra indulgence.
By plating and pairing your lava cake properly, you’ll create an unforgettable dessert experience that looks just as good as it tastes!
Now, let’s move on to how to store and reheat your lava cake without losing its molten magic.
Storing and Reheating Chocolate Lava Cake
Does Lava Cake Need to Be Refrigerated?
If you have leftover lava cakes (which is rare!), here’s how to store them properly:
✔ Short-Term Storage (Up to 2 Days):
- Keep in an airtight container at room temperature for up to 24 hours.
- After 24 hours, refrigerate to maintain freshness.
✔ Long-Term Storage (Up to 3 Months):
- Wrap each cake individually in plastic wrap.
- Store in an airtight container or freezer-safe bag.
- Freeze for up to 3 months.
💡 Tip: If storing unbaked batter, refrigerate it in the ramekins and bake fresh when ready!
The Best Way to Reheat for That Melty Center
The challenge with reheating lava cake is keeping the center gooey while warming up the outer layer. Here’s how to do it right:
🔥 Oven Method (Best for Keeping the Lava Center)
- Preheat oven to 350°F (175°C).
- Place the cake on a baking sheet and cover lightly with foil.
- Heat for 8–10 minutes until warm.
⚡ Microwave Method (For Quick Reheating)
- Place the cake on a microwave-safe plate.
- Heat in 10-second intervals until warm (usually 30 seconds max).
💡 Tip: Avoid overheating in the microwave, as it can cook the molten center and make it dry.
By following these storage and reheating tips, you can enjoy your lava cake anytime without losing its signature gooey texture!
Variations and Customizations
One of the best things about chocolate lava cake is how customizable it is! Whether you want to experiment with different flavors, make it healthier, or accommodate dietary restrictions, there’s a variation for everyone.
Adding Different Flavors (Caramel, Peanut Butter, etc.)
Looking to take your lava cake to the next level? Try these delicious flavor add-ins:
🍮 Salted Caramel Lava Cake – Add a spoonful of caramel sauce to the center of the batter before baking. When you cut into the cake, a rich caramel center will ooze out!
🥜 Peanut Butter Lava Cake – Swirl creamy peanut butter into the batter for a nutty twist. You can also add a peanut butter filling in the center for extra richness.
☕ Mocha Lava Cake – Stir in 1 teaspoon of espresso powder to enhance the chocolate flavor and give a slight coffee kick.
🌶 Spiced Chocolate Lava Cake – Add a pinch of cinnamon and cayenne pepper for a Mexican chocolate-inspired dessert. The warmth of the spices pairs beautifully with the rich chocolate.
Making Vegan and Gluten-Free Versions
Want to make your lava cake vegan or gluten-free? No problem!
🥛 Vegan Chocolate Lava Cake:
✔ Use coconut oil or vegan butter instead of dairy butter.
✔ Replace eggs with flax eggs (1 tbsp ground flaxseed + 3 tbsp water = 1 egg).
✔ Opt for dairy-free chocolate (like Enjoy Life or Hu Kitchen).
🌾 Gluten-Free Lava Cake:
✔ Swap regular flour for almond flour or gluten-free 1:1 baking flour.
✔ Use high-quality gluten-free chocolate to ensure there are no hidden gluten ingredients.
By playing around with these variations, you can create a personalized lava cake that suits any taste or dietary preference!
FAQs on Chocolate Lava Cake
What is the difference between molten cake and lava cake?
Molten cake and lava cake are often used interchangeably, but there’s a slight difference:
✔ Lava Cake has a thinner batter and relies on baking time to keep the center gooey.
✔ Molten Cake is often made with a chocolate ganache center that melts when baked.
Both have a liquid core, but lava cake gets its molten center from undercooking while molten cakes have a filled center.
What is the best chocolate brand for lava cake?
High-quality chocolate makes a huge difference! Valrhona, Ghirardelli, Lindt, and Callebaut are some of the best brands for a rich, velvety lava cake.
Does lava cake need to be refrigerated?
Lava cakes are best served fresh, but if you have leftovers:
✔ Refrigerate for up to 2 days in an airtight container.
✔ Reheat in the oven at 350°F for 8-10 minutes or microwave in 10-second intervals until warm.
What can I use instead of ramekins for lava cake?
If you don’t have ramekins, try these alternatives:
✔ Muffin tins – Grease them well and adjust the baking time to 8-10 minutes.
✔ Oven-safe mugs or bowls – Just ensure they can handle high heat!
✔ Disposable foil cups – Great for easy cleanup and even baking.
Conclusion
Why You Should Try Making Chocolate Lava Cake Today
Chocolate lava cake is a showstopping dessert that’s surprisingly easy to make. Whether you’re impressing guests, indulging in a solo treat, or experimenting with new flavors, this dessert delivers richness, indulgence, and pure chocolate bliss in every bite.
Final Baking Tips for Perfection
✔ Use high-quality chocolate for the best flavor.
✔ Don’t overbake! The center should stay gooey.
✔ Grease and flour the ramekins to prevent sticking.
✔ Let the cakes rest for 30-60 seconds before inverting onto a plate.
Now that you know all the secrets, it’s time to bake your chocolate lava cake and enjoy a slice of molten heaven!